Posts Tagged recipe

This Time Last Year: My Favorite Summer Recipes

It seems especially cruel to post a roundup of summer recipes on a muggy, cloudy day in Portland, Oregon. My heart knows that it’s summer, but my eyes tell me otherwise. It’s all doom and gloom today, folks.

But, whether or not it actually feels like summer in Portland, the truth is that it is summer. We’re coming upon the 4th of July weekend, and (fingers crossed!) the forecast looks downright delightful. I couldn’t be happier. I plan on spending a lot of time in the sunshine, eating bratwurst, grilling asparagus, drinking sangria, and having a darn good time. That’s what freedom is all about, right?

So, then, since I’m getting into the spirit of things I thought I’d post a few of my favorite summertime recipes. These are recipes that I keep going back to, again and again (and again). I discovered each of these recipes last summer, and I will admit that I’ve been thinking about them ever since. It was a long and dreary winter, and I am so excited that summer – and all of the seasonal produce that comes with – has arrived. It’s been a long wait, but it’s worth it.

So, happy summer everyone!

My Favorite Summertime Recipes
(Listed Clockwise from the Top Left)
1. Slow Cooker Carnitas
2. 24 Hour Dill Pickles
3. Cabbage Slaw with Fennel, Apple, and Jalapeno
4. Potato Salad with Yogurt, Arugula and Dill
5. Strawberry and Goat Cheese Hand Pies
6. Smashed Pea and Mint Pesto

Happy 4th of July!
-Lindsay

Sriracha & Blackstrap Molasses Pulled Pork

June is just one giant party after another.

While I’m trying to catch my breath from the madness of May (which includes Mother’s Day and my dad’s birthday), June comes along with Father’s Day (June 19), my mom’s birthday (June 18), my parent’s wedding anniversary (June 3), and my own wedding anniversary (June 20).

There’s just so much to celebrate!

So, rather than try to celebrate each individual event, my family decided to have one celebration that would cover all the various birthdays and holidays. Originally, our plan was to BBQ and laze about in the sun and eat delicious food together. There was talk of ribs and homemade ice cream! But, the Portland forecast had other ideas. The weather this past weekend was quite lame, to say the least. A BBQ was not in the cards.

But, I wasn’t willing to let the weather win. I was feeling sassy and summery and so I decided to make pulled pork sandwiches. Pulled pork has all the flavor and attitude of BBQ, but can be done indoors with a slow cooker. Done and done.

I’ve made pulled pork a few times over the years and it is always a hit. It’s one of those dishes that is hard to screw up. Throw some pork in a slow cooker, add some seasonings, and walk away for 8 hours. That’s my kind of cooking!

Since I was making the pulled pork for a special occasion, I wanted to jazz up the recipe a bit. I’m not a big fan of ketchup (OK, I think it’s nasty), but a lot of pulled pork recipes use ketchup as part of the sauce base. I was in need of an unconventional and ketchup-free pulled pork. So, I turned to my trusty pantry to see what I could find. I was in luck! I had a few key pantry staples on hand that I knew would work together to make a fabulous BBQ sauce: tomato paste, Sriracha, and blackstrap molasses. The tomato paste would bring the tangy tomato element we’re all used to in BBQ sauce, the Sriacha would add heat, and the molasses would add depth and sweetness.

So, I went for it. I threw it all in a crock pot, walked away for hours, and crossed my fingers that would all work. Thankfully, it did work. It was absolutely and positively delicious. It was everything pulled pork should be – spicy, complex, sweet, smoky, and flavorful. My family and I happily devoured our pulled pork sandwiches (and cole slaw, and potato salad, and cantaloupe, and strawberry shortcake…) and thoroughly enjoyed our celebration of all June holidays. What can I say? I’m a lucky lady. So much to celebrate, and so many wonderful people to celebrate with.

So, here’s to you, June. Here’s to wedding anniversaries, fathers, mothers, celebrations, and a big batch of pulled pork.

Blackstrap Molasses & Sriracha Pulled Pork
(Serves 6)

1 yellow onion, sliced thinly
3-4 lbs pork shoulder

Sriracha & Blackstrap Molasses BBQ Sauce:
1/2 cup tomato paste
1/2 cup apple cider vinegar
1/4 cup blackstrap molasses
2 teaspoons Sriracha hot sauce (more/less depending on how much spice you want)
1 teaspoon ground mustard
1 teaspoon freshly ground black pepper

Spice rub:
1 Tablespoon brown sugar
1 teaspoon smoked paprika
1/2 teaspoon cumin
1/2 teaspoon black pepper
1 Tablespoon salt
Dash of cayenne pepper

Method:

Prepare the pork: Mix all spice rub ingredients together in a small bowl. Rub the outside of the pork with the spices, and allow to sit in the fridge for at least 1 hour before cooking (can do this the night before).

Slice the onion thinly, and place most (3/4) of the onion slices in the bottom of the slow cooker.

Cut pork shoulder down into large chunks (2-3 inches) and trim off any excess fat. Place pork pieces atop the onion slices in teh slow cooker. Toss the last onion slices on top of the pork.

Meanwhile, whisk together sauce ingredients: tomato paste, cider vinegar, molasses, Sriracha, ground mustard and black pepper. Pour 1/2 of this mixture over the pork in the slow cooker, reserving the rest of the sauce mixture for later. Cook pork on low heat for 8 hours (Note: I started my pork at 9:30am and needed it to be done by 4 pm. I cooked it on low all morning, but at 2pm I turned the heat up to high.)

When the pork is ready, it should be falling apart and ‘fork tender’. Remove pork (and onions) to a bowl. Discard gristle and shred the pork with 2 forks until desired consistency. Pour any liquid left in the crockpot into a jar, skimming off any unwanted fat. Once the pork has been shredded, place back in the crockpot. Stir in the reserved Sriracha BBQ sauce with the pork. Pour back in some of the cooking liquid, until the pork is moist and juicy.

Serve with yummy buns/bread, coleslaw, and whole grain mustard. (YUM.)

*Note: While the recipe does not start with much liquid, you’ll find the end result to be very moist. As the pork cooks down, it simmers in its own fat and juices. I found there was almost too much liquid, hence why I removed the pork from the liquid and then poured back in the desired amount of liquid. This ensures that you don’t end up with soupy pulled pork sandwiches!

Radish Leaf Pesto Pasta Salad

For whatever reason, I’ve had a really hard time writing this post.

It definitely isn’t due to lack of effort. Quite the contrary, I’ve sat down to write this post many, many times. But every time I turn on my computer and attempt to write about this radish leaf pesto…I simply draw a blank. I try to will my brain to come up with the words, but my brain keeps telling me that it would rather look at pretty things on Pinterest. Apparently, I can’t will my own brain into submission.

All that to say, it would appear that I’ve got a case of writer’s block. It happens to the best of us. I think that I’ve had a hard time writing this recipe because, well, it isn’t really a recipe. Pesto is one of my favorite things to make, for this very reason. There isn’t any one right way to make it, and there are no hard and fast rules for pesto-making. Pesto can take on many different forms, depending on the mood and ingredients at hand. The very freedom I feel in making pesto is the very thing that makes it so hard to write about.

Since I’m having trouble finding the words, I’ll just say this: pesto = greens + garlic + hard cheese + nuts.

It’s as simple as that. To be clear, pesto is traditionally made with basil and pine nuts. But by no means am I traditional, and therefore my pesto tends to skew the same way. Depending upon what I find in my fridge, I’ll make pesto with any combination of the following ingredients: parmesan, pine nuts, hazelnuts, arugula, cilantro, asiago, beet greens, basil, mint, parsley, pecorino romano, almonds, walnuts, and more. There are countless ways to make pesto, it all just depends on what you like (or what you have on hand).

Seeing as this is the season for all things green, I find myself making pesto all the time. My garden and fridge are currently overflowing with leafy greens, and as much as my bunny would love to devour all my extra greens, I usually break his little heart and make a giant batch of pesto instead. Pesto is a fantastic way to reduce waste and use greens before they go bad, and pesto can easily be frozen and then thawed for later use. It just might be the perfect food.

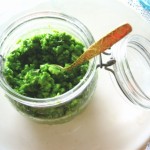
However, in all of my years of pesto-making, it had never dawned on me to use radish leaves. In fact, I’m rather embarassed to admit that it had never occurred to me that you can eat radish leaves (On the same note, I recently saw a recipe for pesto using carrot greens. Genius!). I give all credit for this idea to Portland’s own Chef Vitaly Paley, who recently competed against Chef Garces on Iron Chef America’s “Battle Radish”. During the battle, Chef Paley whipped up many amazing things, including a radish leaf pesto. Even the usually unflappable Iron Chef judges were amazed by his use of radish leaf. It was such an inventive way to use the entire vegetable, as opposed to just throwing the greens away. Chef Paley made all us Portlanders proud! (Note: Chef Paley also won Battle Radish)

It goes without saying that the next time I bought radishes from the farmer’s market, I came straight home and made a batch of radish leaf pesto. It was everything I hoped it would be! The radish leaves lend a little kick of spice to the pesto, and they give it an especially vibrant bright green color. Honestly, I’ll never look at radishes (or their leaves) the same way again. They are a versatile and delicious little vegetable.

(And would you look at that? I see a lot of words on this here page. Maybe I don’t have writer’s block after all!)

RADISH LEAF AND HAZELNUT PESTO PASTA SALAD

Note: When I make pesto, I don’t measure anything. I usually start by throwing a few cloves of garlic in the food processor. Then, I’ll add greens and nuts. Then olive oil, lemon juice, salt, pepper, and a few red pepper flakes. I keep blending and adding olive oil and/or lemon juice, until the pesto looks right to me. I happen to like a nice, thick pesto that isn’t too heavy on the olive oil. The following measurements are a set of rough guidelines, so feel free to alter the amounts in any way you see fit.

For the radish leaf pesto:
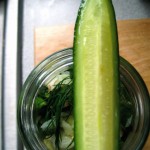
1 large bunch of radish leaves, washed and patted dry (radishes set aside for use in pasta salad)
3 heads of green garlic (or 3 cloves of normal garlic)
1/2 cup toasted hazelnuts
1/4 cup grated parmesan cheese
1/4 – 1/2 cup olive oil
Salt & pepper, to taste
2 Tablespoons lemon juice
Dash of red chili flakes
1 large handful of fresh basil leaves* (or any other leafy green you have on hand)

*Note: I was making a rather large batch of pesto, so one bunch of radish leaves wasn’t going to cut it, hence why I added in basil. You could easily double the amount of radish leaves for a larger batch, but I only had the one bunch on hand.

Method: Mince garlic using a food processor. Add in nuts, radish leaves, basil, and lemon juice. Blend until combined. Add olive oil in small amounts, until you reach desired consistency. Season with salt, pepper, chili flakes, and extra lemon juice (if so desired). If not using immediately, refrigerate until use.

For the pasta salad:
1 small bunch of asparagus
1/4 cup freshly shaved parmesan cheese
1 lb fresh pasta of your choosing
1/2 cup low fat Greek yogurt
1/2 – 1 cup radish leaf pesto
1 cup baby arugula
Radishes, washed and sliced thinly

Method:

Cook pasta according to package directions. Drain pasta water and set pasta aside to cool.

Snap the ends off the asparagus. Bring a small pot of lightly salted water to a boil. Meanwhile, prepare an ice bath. When the pot of water is boiling, add asparagus. Allow the asparagus to cook for 2 minutes. After 2 minutes, remove the asparagus from the boiling water and immediately plunge into the ice bath. Once the asparagus has cooled (a few minutes), remove it from the ice bath and cut into 1″ pieces.

Toss cooled pasta with a drizzle of olive oil. Stir together pesto and Greek yogurt, then toss yogurt and pesto mixture with the pasta. Gently stir in parmesan cheese, sliced radishes, asparagus and arugula. Allow to chill at least 20 minutes before serving, as this will allow the flavors to meld.

Kale & Green Garlic with Cheesy Polenta

Going into this month, I knew it was going to be nuts. I had a baby shower to throw, the Montavilla farmer’s market Grand Opening to plan and attend, a wedding to coordinate, and my own wedding anniversary to celebrate.

All of these are incredibly wonderful things. I’m going to be an aunt for the second time! A dear friend got married to a man who makes her so very happy. The farmer’s market that I volunteer for opened for another great season. And last, but certainly not least, I get to celebrate being married to my best friend for two years. I’m a lucky lady.

But all of these wonderful things do require a bit of time and energy, and somehow I never seem to have much of either. In the midst of all of this, I’m working full time, attempting to write a food blog, and am desperately trying not to kill my garden. There just aren’t enough hours in the day. But when life hands you crazy, just whip up some kale and polenta. That’s what I always say. OK, if I’m being honest, I’ve never said that before in my entire life. But, the moral of the story is this: when you have an incredibly busy schedule and you have kale growing like weeds in your garden, you should take a few minutes out of your busy schedule and make a delicious and satisfying kale dinner.

So that is precisely what I did. I picked a big bunch of Red Russian Kale from my garden, and quickly sautéed it with bacon, green garlic, onion, and lemon. I whipped up a quick batch of polenta, stirred in some freshly grated parmesan cheese, and proceeded to eat a large bowl of cheesy-bacony-polenta-and-kale goodness. The meal was so satisfying, flavorful, and comforting. And, it took all of 15 minutes to cook!

In the midst of all the craziness, I took the time to sit down to dinner with my husband, enjoyed a glass of wine, and allowed myself to breathe. It was just what I needed.

I know I’m not the only one out there who struggles with being over-committed and busy. Its the world we live in. I’m sure many of us are are in the same boat – scratching our heads, pouring over our calendars and wondering how we managed to book up the whole summer before it even started. Life has a funny way of quickly spiraling out of control. It happens. So, if you find yourself feeling overwhelmed by the complexities of life, I challenge you to slow down. Take the time to sit down to dinner; to enjoy a meal with friends or family. Everything else can wait.

And, of course, if you’re in need of a little inspiration I do declare that this is the perfect meal to make when you’re pressed for time. Its so good, in fact, that I’ve already made it twice this week!

Kale & Green Garlic with Cheesy Polenta
Serves 4

1 large bunch of Red Russian Kale (or other green, such as Chard), washed, de-stemmed, and roughly chopped.
4 strips of bacon, cut into 1/2 inch strips
1/2 yellow onion, diced
3 heads of green garlic*, minced
The juice of 1/2 a lemon
Red pepper flakes
Salt & pepper to taste

*Note: Green garlic can be found at farmer’s markets at this time of year. It is much milder than regular garlic, so it isn’t overpowering. If you can’t find green garlic, substitute 1-2 cloves of regular garlic.

Method:
Heat large pan or skillet over medium heat. Once the pan is hot, add bacon pieces. Cook until fat has rendered and bacon has begun to crisp. Remove from pan with a slotted spoon and allow to drain on a paper towel.

Return pan (with bacon fat) back to the stove. If you have really fatty bacon, you may need to pour off some of the fat (You want about 1 Tablespoon of bacon grease left in the pan). Cook onions and diced green garlic in the bacon fat until tender, about 3-4 minutes. At this point, add in kale and squeeze lemon juice over the whole pan. Cover, turn down to medium-low, and allow kale to cook and steam for 5 minutes. Stir occasionally, checking to make sure everything is cooking evenly. Once the kale has fully wilted (8-10 minutes), add bacon back into the pan. Squeeze a bit more lemon juice over the mixture, and season with salt, pepper, and red chili flakes.

Remove from heat, and serve kale and green garlic mixture over cheesy polenta.

For the polenta:
4 cups water
1 teaspoon salt
Healthy amount of freshly ground black pepper
3/4 cup polenta (or corn grits)
1/4 cup freshly grated parmesan cheese
1 Tablespoon unsalted butter

Combine water, salt, and pepper in a small saucepan. Bring water to a boil. Once water is boiling, pour polenta in a steady stream into the water, whisking constantly. Reduce heat to medium-low and continue to whisk. Stir until polenta is thickened, but creamy (8-10 minutes). Remove from heat. Stir in cheese and butter, mix until incorporated. Taste, add salt and pepper if needed (Note: I like my polenta to be quite peppery.)

Spicy Pickled Carrots

As I mentioned earlier, I recently traveled to San Francisco to visit an old friend. We did some sightseeing – and of course, we did some eating – and I think my favorite stop on the whole trip was at Tartine Bakery.

Everything we ordered at Tartine was spot on. The bread pudding was moist, but not soggy. The asparagus monsieur was the happiest of marriages: melty cheese, crunchy bread, and roasted asparagus. My Americano was a thing of perfection.

Its been a few weeks since my trip to SF, and I still catch myself daydreaming about the late afternoon “snack” we had a Tartine.

But you want to know something funny? The one thing that really stuck with me were the side of pickled carrots.

There was just something special about them. I think that part of the reason I loved them so much was the fact that they were unexpected. I didn’t know that when you ordered bready cheesy goodness that it came with a side of house made pickles. Let alone, spicy carrot pickles. They were crunchy and briny – with just the right amount of spice – and were the perfect compliment to an ooey gooey cheesy sandwich. I was in love. Which brings me to the subject of pickles…

If you don’t recall from last summer, I really love pickles. I love eating them, making them, blogging about them, etc. (See exhibits: A, B, C, D). I went a bit pickle crazy last summer, but I finally stopped posting pickle recipes after my sisters begged me to knock it off. Not every shares my obsession for pickles, I suppose.

But, the spicy pickled carrots at Tartine were amazing and they reminded me of how much I love all things pickled. So, then, when I got back home to Portland and saw a bunches of small carrots for sale at the farmer’s market – it seemed like fate. I snatched up bunches of the cute little carrots and took them home to make my very own spicy pickled carrots.

I have no idea how Tartine actually makes their carrot pickles, but I stumbled across Thomas Keller’s recipe for them and figured it would work nicely. I love that Keller adds a bit of curry powder into his pickle brine as it gives the brine a vibrant color, and adds an interesting flavor element. While Keller calls for a fresh jalapeno, I opted to use red pepper flakes as I like the color contrast and how the red pepper flakes stick to the carrot pickles to give an extra punch of spice.

Now, please, I beg of you: come to my house and help me eat some of these carrot pickles. I’ve been eating them like a crazy person and could use a little help. Please and thanks. :)

Spicy Pickled Carrots
(Adapted from Thomas Keller’s Ad Hoc At Home)

10-15 small carrots (or larger carrots, cut into carrot sticks)
1 cup white wine vinegar
1/2 cup white sugar
1/2 cup water
1 bay leaf
1 teaspoon yellow mustard seeds
1 teaspoon curry powder
1 teaspoon red pepper flakes

Wash and trim carrots. If using small whole carrots, scrub, but leave whole.

In a small saucepan, bring vinegar, water, sugar, curry poweder and bay leaf to a boil. Once boiling, remove from heat and discard bay leaf.

Meanwhile, pack as many carrots (or carrot sticks) as you can into a sterilized jar. Pour chili flakes and mustard seeds into the jar. Pour hot pickling liquid over the carrots, until the jar is full. Seal and refrigerate. Should keep in the fridge for 1 month (or more).

New Market Post: Shaved Asparagus Salad

I am so excited – my neighborhood farmer’s market opens this week! On Sunday, June 5th, The Montavilla Farmer’s Market officially opens for the 2011 season.

I’ve been volunteering with the market for a few months now, and I have nothing but good things to say about the market, the vendors, and the volunteers. I’m so lucky to live next to such a great little farmer’s market!

As part of my volunteer duties, I occasionally blog for the market. In honor of opening day, I just posted a new blog with a roundup of spring recipes, including a new recipe I just tried: Shaved Asparagus Salad with Hazelnuts and Mint. This salad is so simple, and yet so fresh and tasty. I never knew that raw asparagus could be so delicious and tender!

Head on over to the Montavilla Farmer’s Market blog to see the full post and recipe!

For the love of beets.

I apologize for the sudden outpouring of beet recipes on my blog. I don’t quite know what’s gotten into me.

I think I’ve mentioned this before, but I did not like beets until somewhat recently. Not one bit. I don’t know what finally persuaded me, but suddenly I can’t get enough of them! They are just so darn beautiful (and tasty! And good for you!) So many great things rolled up into one pretty little package.

My theory behind the sudden outpouring of beet recipes is that I’m making up for lost time. All those years I spent hating beets…I had no idea what I was missing. So now that I’ve fallen in love with this ruby red root vegetable, I’m going a little beet crazy. To all you beet haters out there: I apologize. I know that my blog is quite beety at the moment. So, I promise that this will be the last of the beet recipes for awhile, OK? Besides, I have spring vegetables to concentrate on now. Bring on the asparagus, radishes, strawberries, snap peas, and more!

However, I will say one more thing to the beet haters out there. If you could find it in your heart to give beets another chance, you might be pleasantly surprised. Beets – when done right – are nothing like their soggy, ghoulish canned counterparts (don’t even get me started on canned beets: ICK!). With that being said, I’ll leave you with a few of the recipes that have helped me learn to love beets.

Beet Quinoa Pancakes
Boozy Beet and Apple Popsicles
BLBs – Bacon, Lettuce, and Beet Sandwiches

And now, for all you beet lovers…you’re in for a real treat. I have not one, but two beet recipes for you. I served both of these at my Cheese, Wine and Swine dinner party (However, I did not serve them together, as I thought that might be overdoing it a touch). The Babushka (beet cocktail) was paired with the melon and duck proscuitto appetizer, and the Roasted Beet and Fennel Salad was served as the second course (paired with a lovely French Rosé).

I’ll leave you all with this thought: this weekend, I planted 3 rows of chioggia beets in my garden. So when I harvest those little beauties, I can promise you I’ll go on a beet craze again. For now, I’ll leave you with these two recipes and lay off the beets for awhile. :)

The Babushka
(Makes 1 cocktail)
3 oz beet vokda (Click here for the recipe)
1 tablespoon fresh squeezed lemon juice
1 teaspoon simple syrup (*or ginger simple syrup, recipe here)
1 oz of Prosecco (or other sparkling wine)

Method:
In pitcher or measuring cup, gently stir together beet vodka, lemon juice and simple syrup. Pour into a chilled martini glass. Gently pour prosecco over the top. Garnish with lemon wedge. Serve immediately.

Roasted Beet and Fennel Salad with Whipped Goat Cheese and Pistachio Vinaigrette
(Serves 4)
4 large beets
1 fennel bulb
1/2 cup good quality goat cheese, at room temperature
2 tablespoons creme fraiche or sour cream
1/3 cup shelled pistachios, roughly chopped
1/8 tsp nutmeg
The juice of one lemon
1/2 tsp apple cider vinegar
1/4 cup olive oil
Salt & pepper to taste

Preheat oven to 400 degrees.

Roast beets: Wash the beets and remove greens (set aside for another use). Do not peel the beets. Wrap each beet in a piece of tinfoil and place directly on rack in preheated oven. Roast 45 minutes to an hour, or until beets are tender when pricked with a fork or knife. Allow beets to cool. Once cooled, the skin should peel or rub off easily. Remove skin and slice beets into 1/4 or 1/2 cubes.

Roast fennel: Remove tops (fronds) of the fennel, set aside for later. Slice fennel bulb thinly (like you would an onion), toss with olive oil to coat. Spread fennel in an even layer on a baking sheet. Roast for 15 minutes in a 400 degree oven, or until tender.

Make pistachio vinaigrette:
Chop pistachios or pulse quickly in a food processor. Pour olive oil over the pistachios, stir to combine Add lemon juice, salt, pepper, and cider vinegar. The mixture will be thick.

Whip the goat cheese: using a whisk, blender, or hand mixer, whip goat cheese and creme fraiche together until goat cheese is whipped and fluffy. Add extra creme fraiche if needed. Season goat cheese mixture with nutmeg and a dash of black pepper.

Combine cooled beets and fennel in a mixing bowl. Toss with liberal amount of the pistachio dressing. Take reserved fennel fronds & chop finely – until you have 2 teaspoons worth. Sprinkle finely chopped fennel fronds over the salad, stir just to combine. Serve beet salad in small bowls and top with a healthy dollop of whipped goat cheese. Sprinkle extra pistachios atop the goat cheese. Serve at room temperature.

Note: For those of you who asked about recipes from the Cheese, Wine, and Swine dinner party: I hope you were pleased with what I’ve posted. This will be the last of them! My husband was responsible for making the duck prosciutto, and I’m still waiting on him to write up that post. :) And I’ll admit – the duck proscuitto was really tasty, but we’re definitely still beginners at the fine art of charcuterie. For a full tutorial on how to make your own duck proscuitto, go here.